In this project, we will explain how to design and develop a Bluetooth-controlled robot using the HACK-AF-MOTOR-SHIELD—an Arduino Nano-friendly, ready-to-use robotics development platform. Since this board is pin-compatible with the classical Adafruit Motor Shield, users can leverage Adafruit's high-performance library functions directly.
To establish wireless control, we'll interface an HC-05 Bluetooth Transceiver directly with the shield's onboard header and use a smartphone Voice/Command Android app to steer the robotic car remotely.
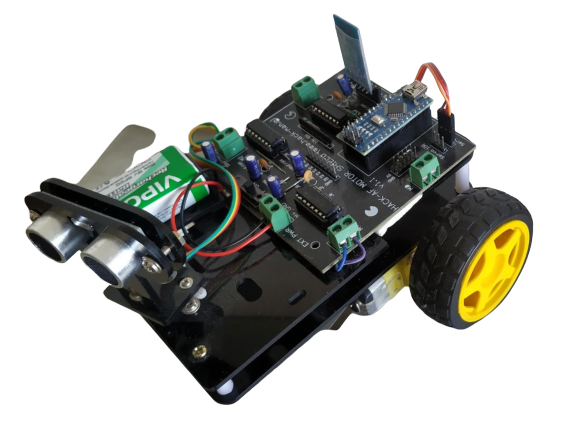
Figure 1: Fully Configured Robotic Car Platform
- High-fidelity wireless Bluetooth communication.
- Smart-phone transmitter application control.
- HACK-AF-MOTOR-SHIELD board integrating controller & transceiver slots.
- Dual L293D motor drivers enabling bidirectional 4WD steering.
Project Demonstration Video
Hardware Requirements
- Development Board: HACK-AF-MOTOR-SHIELD Board
- Microcontroller: Arduino Nano Board (with USB programming cable)
- Transceiver Module: HC-05 Bluetooth Serial Module
- Motors: DC 3-6V BO Gear Motors & Plastic Tire Wheels
- External Power: 9V Battery / Rechargeable Li-ion pack
- Chassis: Robotic Car Chassis kit
Core Component Details
1. HACK-AF-MOTOR-SHIELD Board
HACK-AF-MOTOR-SHIELD is an Arduino Nano-friendly, ready-to-use robotics platform. It is fully pin-compatible with the classic Adafruit motor shield, meaning you can directly deploy Adafruit's libraries. Using just three digital pins on the Arduino Nano, it can drive 2 hobby servos, 4 bi-directional DC gear motors, or two 4-wire stepper motors.
Crucially, the board includes a dedicated onboard slot to mount the HC-05/HC-06 Bluetooth module directly, eliminating messy breadboard connections.
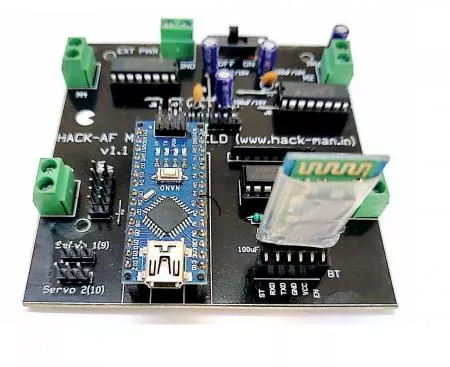
Figure 2: HACK-AF-MOTOR-SHIELD Robotics Board
HACK-AF Shield Features
- Pin-compatible with classic Adafruit Motor Shield libraries.
- Integrated slots to plug in standard HC-05/HC-06 Bluetooth serial modules.
- Dual onboard L293D H-Bridge motor drivers providing 0.6A per bridge (2A peaks) with surge protection and kickback protection diodes.
- Dedicated pin headers for external sensor/actuator hookups.
- Onboard Master Power On/Off slide switch.
2. Arduino Nano Microcontroller
The Arduino Nano is a small, complete, and breadboard-friendly microcontroller board based on the ATmega328P. It shares almost identical processing capability with the larger Arduino Uno but is condensed into a highly compact form factor, operating with a Mini-B USB cable.
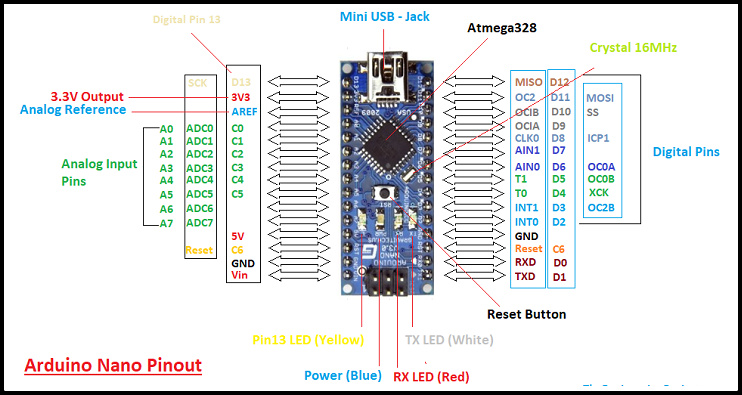
Figure 3: Arduino Nano Microcontroller
Arduino Nano Specifications
- ATmega328P operating at 16MHz clock speed.
- 14 Digital pins (6 PWM channels) & 8 Analog input pins.
- Compact layout: 45mm x 18mm, making it perfect for weight-sensitive applications.
- Flash Memory: 32 KB (2 KB reserved for the bootloader).
3. HC-05 Bluetooth Serial Module
The HC-05 serial module is designed for wireless serial connection setups. It uses a base 2.4GHz radio transceiver implementing EDR (Enhanced Data Rate) up to 3Mbps, making it a robust master/slave communications link.
HC-05 Specifications
- Highly sensitive -80dBm transceiver with +4dBm RF transmit power.
- Low power consumption (1.8V to 3.6V I/O operation).
- Integrated PCB antenna with simple UART serial command interface.
- Default serial baud rate: 38400 (anti-reverse 6-pin anti-polarity safety).
4. BO Gear Motor with Plastic Tire Wheel
Standard high-torque Battery Operated DC gear motors with a built-in 48:1 reduction ratio to provide optimal traction and speeds between 20 to 48 meters per minute.
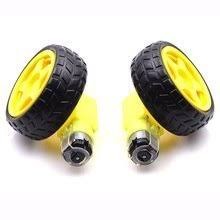
Figure 4: Geared BO Motor and Wheel
5. Stable Robotic Chassis
A multi-tier chassis layout providing ample space to cleanly secure the HACK-AF shield, rechargeable batteries, and gear motors.

Figure 5: High-grade Dual-Tier Robotic Chassis
Circuit Connections
Secure the Arduino Nano directly into the center headers of the HACK-AF-MOTOR-SHIELD. Insert the HC-05 Bluetooth module into the pre-routed 4-pin female headers. Connect the DC motors to terminal block outputs M1, M2, M3, and M4. Insert a 7.4V - 9V battery pack to the external power terminals of the shield.

Figure 6: Complete Platform Schematic Diagram
Arduino Source Code
Use the following code block to program your Arduino Nano. Ensure that the HC-05 module is temporarily unplugged while uploading code to avoid serial programming port conflicts.
// Voice & Bluetooth Controlled Robotic Car using HACK-AF-MOTOR-SHIELD - NextGenRoboticX
#include <AFMotor.h>

AF_DCMotor motor1(1); // Left Front Motor
AF_DCMotor motor2(2); // Left Rear Motor
AF_DCMotor motor3(3); // Right Front Motor
AF_DCMotor motor4(4); // Right Rear Motor

char commandVal;

void setup() {
  Serial.begin(9600); // Bluetooth Serial Communication (HC-05 onboard slot)

  // Set initial motor speed
  motor1.setSpeed(200);
  motor2.setSpeed(200);
  motor3.setSpeed(200);
  motor4.setSpeed(200);
}

void loop() {
  if (Serial.available() > 0) {
    commandVal = Serial.read();
    stopRobot(); // Always stop first before executing next command

    switch (commandVal) {
      case 'F':
        moveForward();
        break;
      case 'B':
        moveBackward();
        break;
      case 'L':
        turnLeft();
        break;
      case 'R':
        turnRight();
        break;
      case 'S':
        stopRobot();
        break;
    }
  }
}

void moveForward() {
  motor1.run(FORWARD);
  motor2.run(FORWARD);
  motor3.run(FORWARD);
  motor4.run(FORWARD);
}

void stopRobot() {
  motor1.run(RELEASE);
  motor2.run(RELEASE);
  motor3.run(RELEASE);
  motor4.run(RELEASE);
}

void turnLeft() {
  motor1.run(BACKWARD);
  motor2.run(BACKWARD);
  motor3.run(FORWARD);
  motor4.run(FORWARD);
}

void turnRight() {
  motor1.run(FORWARD);
  motor2.run(FORWARD);
  motor3.run(BACKWARD);
  motor4.run(BACKWARD);
}

void moveBackward() {
  motor1.run(BACKWARD);
  motor2.run(BACKWARD);
  motor3.run(BACKWARD);
  motor4.run(BACKWARD);
}
Limitations & Applications
Limitations
- Bluetooth control range is limited to ~10 meters (standard class 2 transceiver constraints).
- Must ensure stable voltage to the HC-05 slot. Inadequate voltage may prevent successful mobile pairing.
Applications
- Short-range remote surveillance drone platforms.
- Educational assistive technology platforms (e.g., smart wheelchairs).
- Voice-activated smart home mechatronics applications.